Difference between revisions of "FreeScan Audio Recording"
From The RadioReference Wiki
m |
|||
| (4 intermediate revisions by 2 users not shown) | |||
| Line 5: | Line 5: | ||
</gallery> | </gallery> | ||
* Make sure a good shielded connection exists between the scanner and PC. For Windows soundcard issues, please see the [[Connecting Radios to Soundcards]] article | * Make sure a good shielded connection exists between the scanner and PC. For Windows soundcard issues, please see the [[Connecting Radios to Soundcards]] article | ||
| − | ** For audio issues such as popping, thumping and so on, please see the [[ | + | ** For audio issues such as popping, thumping and so on, please see the [[DMA P25 Decoding and Audio Issues]] article |
* Bring up the Virtual Control setup screen by using the Scanner/Control Scanner from the pulldown, or use Shift-F1 | * Bring up the Virtual Control setup screen by using the Scanner/Control Scanner from the pulldown, or use Shift-F1 | ||
# In the ''Basic'' area, make sure the ''Enable Recording'' box is checked. | # In the ''Basic'' area, make sure the ''Enable Recording'' box is checked. | ||
| Line 14: | Line 14: | ||
## %Site% - the site name (trunking only) | ## %Site% - the site name (trunking only) | ||
## %Name% - the name to be used in the file | ## %Name% - the name to be used in the file | ||
| − | ## % | + | ## %rssi% - Received signal level |
## %chan% - channel number | ## %chan% - channel number | ||
## %nac% - [[NAC|Network Access Code]] '''Note: XT Scanners only''' | ## %nac% - [[NAC|Network Access Code]] '''Note: XT Scanners only''' | ||
| − | ## %date% - the date in | + | ## %date% - the date in local short format. This is defined in the Regional Settings of Control Panel. |
| − | ## | + | ## %time% - the time in military format |
## %hit% - hit number | ## %hit% - hit number | ||
| + | |||
| + | * Double click on the "Save To" directory box to show that directory in Explorer. | ||
| + | * No changes are applied until after you click on Apply. | ||
| + | * The input level will only show when there is a scanner connected in Virtual Control mode and is connected through the sound card as well. | ||
==Modify Systems/Groups== | ==Modify Systems/Groups== | ||
| Line 29: | Line 33: | ||
| − | [[Category: | + | |
| + | [[Category:FreeSCAN]] | ||
Latest revision as of 10:25, 3 July 2012
Setup Screens
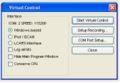
Setup VC screen
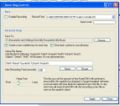
Recording Options


- Make sure a good shielded connection exists between the scanner and PC. For Windows soundcard issues, please see the Connecting Radios to Soundcards article
- For audio issues such as popping, thumping and so on, please see the DMA P25 Decoding and Audio Issues article
- Bring up the Virtual Control setup screen by using the Scanner/Control Scanner from the pulldown, or use Shift-F1
- In the Basic area, make sure the Enable Recording box is checked.
- Be sure that your soundcard is listed in the Record From box. Use the pulldown and select the proper device.
- In the Advanced Settings area, choose which directory to which the sound files will be placed.
- Choose the token(s) that you can use to name your file(s).
- %System% - the name of the System
- %Site% - the site name (trunking only)
- %Name% - the name to be used in the file
- %rssi% - Received signal level
- %chan% - channel number
- %nac% - Network Access Code Note: XT Scanners only
- %date% - the date in local short format. This is defined in the Regional Settings of Control Panel.
- %time% - the time in military format
- %hit% - hit number
- Double click on the "Save To" directory box to show that directory in Explorer.
- No changes are applied until after you click on Apply.
- The input level will only show when there is a scanner connected in Virtual Control mode and is connected through the sound card as well.
Modify Systems/Groups
- To enable recording;
- In the Systems screen, look for the Tape Out area. See the Freescan Create Systems page for image examples. The following settings apply;
- Marked - only those talkgroups (trunk system) or frequencies (conventional) with a check mark in the Rec Out box in the associated group will be recorded.
- All - All talkgroups (trunk system) or frequencies (conventional) in the associated group will be recorded, regardless if the Rec Out box has been checked or not.
- If you selected Marked for the system that houses these group(s), make sure you click on the Rec Out box, which is only visible in the expanded view (the simple view box is not checked). See the Freescan Create Group screen for image examples