Difference between revisions of "Freescan Export"
From The RadioReference Wiki
(new Freescan export article) |
m |
||
| (7 intermediate revisions by one other user not shown) | |||
| Line 1: | Line 1: | ||
<gallery> | <gallery> | ||
| − | Image: | + | Image:FS conv example v8.JPG|Conventional system example |
| − | Image: | + | Image:FS trunk example v8.JPG|Trunk system example |
| − | Image: | + | Image:FS File2 v8.JPG|File Pulldown menu |
| + | Image:FS export menu v8.JPG|Save as file menu | ||
| + | Image:FS export cnv v8.JPG|Conventional export | ||
| + | Image:FS export tlkgrps v8.JPG|Trunked export | ||
</gallery> | </gallery> | ||
| − | + | ''Click on the image to expand''<br> | |
| + | |||
#If you wish to only export 1 system, the cursor must be on the system name and show the system characteristics. Examples of a conventional and trunked system are displayed above. | #If you wish to only export 1 system, the cursor must be on the system name and show the system characteristics. Examples of a conventional and trunked system are displayed above. | ||
#The cursor need not be in a particular position if all systems are to be exported. | #The cursor need not be in a particular position if all systems are to be exported. | ||
| + | #From the File pulldown, select Export. Click on 'This System' or 'All Systems' | ||
#The 'save as' file menu appears. Supply a valid name | #The 'save as' file menu appears. Supply a valid name | ||
#Freescan exports the system. | #Freescan exports the system. | ||
| Line 15: | Line 20: | ||
Return to [[FreeScan User Guide]] | Return to [[FreeScan User Guide]] | ||
| − | [[Category: | + | |
| + | [[Category:FreeSCAN]] | ||
Latest revision as of 10:28, 3 July 2012

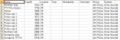
Conventional system example
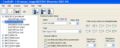
Trunk system example
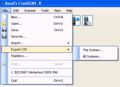
File Pulldown menu
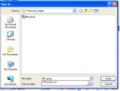
Save as file menu
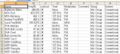
Conventional export
Trunked export


Click on the image to expand
- If you wish to only export 1 system, the cursor must be on the system name and show the system characteristics. Examples of a conventional and trunked system are displayed above.
- The cursor need not be in a particular position if all systems are to be exported.
- From the File pulldown, select Export. Click on 'This System' or 'All Systems'
- The 'save as' file menu appears. Supply a valid name
- Freescan exports the system.
CSV (or Comma Seperated Values) files are useful for transferring data from one program to another, when no other format is available
Return to FreeScan User Guide