Difference between revisions of "Freescan RR Conv Import"
From The RadioReference Wiki
| Line 2: | Line 2: | ||
Image:FS RR Import conv pulldown.JPG|Figure 1 | Image:FS RR Import conv pulldown.JPG|Figure 1 | ||
Image:FS RR conv import1 v8.JPG|Figure 2 | Image:FS RR conv import1 v8.JPG|Figure 2 | ||
| − | Image:FS RR conv | + | Image:FS RR conv import3 v8.JPG|Figure 3 |
| − | Image: | + | Image:RR Browser Preview.png|Figure 4 |
Image:Skip tags conventional.JPG|Figure 5 | Image:Skip tags conventional.JPG|Figure 5 | ||
| − | Image:RR | + | Image:FS RR conv import2 v8.JPG|Figure 6 |
Image:FS RR conv finished v8.JPG|Figure 7 | Image:FS RR conv finished v8.JPG|Figure 7 | ||
Image:FS Conv logs.JPG|Figure 8 | Image:FS Conv logs.JPG|Figure 8 | ||
| Line 17: | Line 17: | ||
## If you are online and wish to use the RR web service, enter your RadioReference Userid and Password and hit 'Connect'. Note that once you are signed on, you can use the History pulldown to return to a previously-utilized RR site. Note the hotkeys are accessed with ALT and a number. Once you see numbers above each of the pulldowns and are connected, click on the Options tab (figure 2). | ## If you are online and wish to use the RR web service, enter your RadioReference Userid and Password and hit 'Connect'. Note that once you are signed on, you can use the History pulldown to return to a previously-utilized RR site. Note the hotkeys are accessed with ALT and a number. Once you see numbers above each of the pulldowns and are connected, click on the Options tab (figure 2). | ||
## If you are using the RR CD ROM, insert it into your CD drive, then hit the RR CD button. When the CD has been acquired, click on the Options tab (figure 2) {{color|red|NEW 2.02}} | ## If you are using the RR CD ROM, insert it into your CD drive, then hit the RR CD button. When the CD has been acquired, click on the Options tab (figure 2) {{color|red|NEW 2.02}} | ||
| − | #If you are | + | #Once you have hit 'Connect' or the CD has loaded, a number will show up next to the 'Province/State' pulldown. Select the desired province/state from the list |
| + | #If you are interested in downloading a particular county, once a number shows up next to the county pulldown, select it from the list | ||
| + | #You can now choose whether to download a particular state or county agency. Select the appropriate agency from the list. If you wish to just download the entire county, proceed to the next step. | ||
| + | #Click on the 'Groups' tab (Figure 3). If you wish to clear all the checkmarks to make your own selections, hit the 'None' button; 'All' selects all groups shown. You can select individual groups by first hitting 'None', then '''double-click''' on the group you wish to import. | ||
| + | ##If you wish to view the entry in the RadioReference database, use the 'View in Browser' button. An example is shown in Figure 4. You can do this at any time during the process. | ||
| + | # Click on the 'My Skip Tags' tab (Figure 5). This will allow you to prevent certain service tagged data from being downloaded. For example, if you don't want to see any Fire-Tac frequencies, then '''double click''' on that name. A single click will clear the checkmark. This function is not available when importing from the CD Rom {{color|red|NEW 2.02}} | ||
| + | #Click on the 'Options' tab (Figure 6). If you are downloading to an analog trunktracker (anything except the BCD396T, BCD396XT, BCD996T or BCD996XT) then check the 'Skip Channels Marked As Digital' option. Be sure to consider whether you wish to allocate a quick key; either assign one yourself, let FS find the next free one, or don't assign one. Check other options as appropriate. | ||
##DMA scanners have a limit of 20 groups per system. This can be an issue when importing certain systems because they contain many subcategories that only have 1 frequency in the entire group and some would consider entirely wasting space. A new feature has been added that lets you select the minimum number of channel that should appear in their own group. For example, if you set it to 3, any group with less then 4 frequencies will still be imported but its channels will all be placed in a miscellaneous group. -This is great for rural areas where you get these behemoth systems that have 30, 40, or 50 groups with only one or two frequencies per group compressed down to one system with a Misc group that contains all the respective frequencies. Larger sized subcategories will continue to be imported as their own groups. To activate this function, click on the last option that begins with ''Place Channels'' and select the number of frequencies from the pulldown | ##DMA scanners have a limit of 20 groups per system. This can be an issue when importing certain systems because they contain many subcategories that only have 1 frequency in the entire group and some would consider entirely wasting space. A new feature has been added that lets you select the minimum number of channel that should appear in their own group. For example, if you set it to 3, any group with less then 4 frequencies will still be imported but its channels will all be placed in a miscellaneous group. -This is great for rural areas where you get these behemoth systems that have 30, 40, or 50 groups with only one or two frequencies per group compressed down to one system with a Misc group that contains all the respective frequencies. Larger sized subcategories will continue to be imported as their own groups. To activate this function, click on the last option that begins with ''Place Channels'' and select the number of frequencies from the pulldown | ||
| − | |||
| − | |||
| − | |||
| − | |||
#Click on the Import button. Figure 7 shows the results of the import. Be sure to edit the various functions such as name, quick keys and other items. Make sure the system or groups are not locked out. | #Click on the Import button. Figure 7 shows the results of the import. Be sure to edit the various functions such as name, quick keys and other items. Make sure the system or groups are not locked out. | ||
#When available, coordinates from RR Web service are imported as well. Be sure to enable the use of this function on the system screen. All RR Web service messages are now logged (see figure 8). | #When available, coordinates from RR Web service are imported as well. Be sure to enable the use of this function on the system screen. All RR Web service messages are now logged (see figure 8). | ||
Revision as of 19:03, 18 October 2010
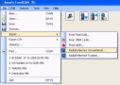
Figure 1
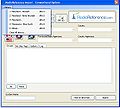
Figure 2
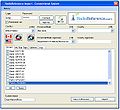
Figure 3
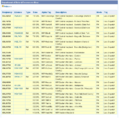
Figure 4
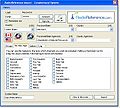
Figure 5
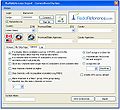
Figure 6
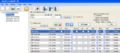
Figure 7
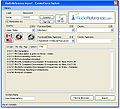
Figure 8


Click on the image to expand
- From the file pulldown select Import then RadioReference Conventional (figure 1). For a moment, your subscription expiration date will flash on the left lower corner of the form
- To begin the process, choose whether you are using the RR Web service online or via the CD ROM;
- If you are online and wish to use the RR web service, enter your RadioReference Userid and Password and hit 'Connect'. Note that once you are signed on, you can use the History pulldown to return to a previously-utilized RR site. Note the hotkeys are accessed with ALT and a number. Once you see numbers above each of the pulldowns and are connected, click on the Options tab (figure 2).
- If you are using the RR CD ROM, insert it into your CD drive, then hit the RR CD button. When the CD has been acquired, click on the Options tab (figure 2) NEW 2.02
- Once you have hit 'Connect' or the CD has loaded, a number will show up next to the 'Province/State' pulldown. Select the desired province/state from the list
- If you are interested in downloading a particular county, once a number shows up next to the county pulldown, select it from the list
- You can now choose whether to download a particular state or county agency. Select the appropriate agency from the list. If you wish to just download the entire county, proceed to the next step.
- Click on the 'Groups' tab (Figure 3). If you wish to clear all the checkmarks to make your own selections, hit the 'None' button; 'All' selects all groups shown. You can select individual groups by first hitting 'None', then double-click on the group you wish to import.
- If you wish to view the entry in the RadioReference database, use the 'View in Browser' button. An example is shown in Figure 4. You can do this at any time during the process.
- Click on the 'My Skip Tags' tab (Figure 5). This will allow you to prevent certain service tagged data from being downloaded. For example, if you don't want to see any Fire-Tac frequencies, then double click on that name. A single click will clear the checkmark. This function is not available when importing from the CD Rom NEW 2.02
- Click on the 'Options' tab (Figure 6). If you are downloading to an analog trunktracker (anything except the BCD396T, BCD396XT, BCD996T or BCD996XT) then check the 'Skip Channels Marked As Digital' option. Be sure to consider whether you wish to allocate a quick key; either assign one yourself, let FS find the next free one, or don't assign one. Check other options as appropriate.
- DMA scanners have a limit of 20 groups per system. This can be an issue when importing certain systems because they contain many subcategories that only have 1 frequency in the entire group and some would consider entirely wasting space. A new feature has been added that lets you select the minimum number of channel that should appear in their own group. For example, if you set it to 3, any group with less then 4 frequencies will still be imported but its channels will all be placed in a miscellaneous group. -This is great for rural areas where you get these behemoth systems that have 30, 40, or 50 groups with only one or two frequencies per group compressed down to one system with a Misc group that contains all the respective frequencies. Larger sized subcategories will continue to be imported as their own groups. To activate this function, click on the last option that begins with Place Channels and select the number of frequencies from the pulldown
- Click on the Import button. Figure 7 shows the results of the import. Be sure to edit the various functions such as name, quick keys and other items. Make sure the system or groups are not locked out.
- When available, coordinates from RR Web service are imported as well. Be sure to enable the use of this function on the system screen. All RR Web service messages are now logged (see figure 8).
- See the Limitations article for important information on limits and known issues
Return to the FreeScan User Guide