Difference between revisions of "Freescan Upload"
From The RadioReference Wiki
| Line 1: | Line 1: | ||
<gallery> | <gallery> | ||
| − | Image: | + | Image:FS sys example v8.JPG|Figure 1 |
| − | Image: | + | Image:FS scanner pulldown v8.JPG|Figure 2 |
| − | Image: | + | Image:FS upload queued v8.JPG|Figure 3 |
| − | Image: | + | Image:FS upload checked v8.JPG|Figure 4 |
| − | Image: | + | Image:FS upload issue v.8.JPG|Figure 5 |
| + | Image:FS quick editor v.8.JPG|Figure 6 | ||
</gallery> | </gallery> | ||
| Line 11: | Line 12: | ||
#Load the file you wish to upload. Figure 1 shows an example | #Load the file you wish to upload. Figure 1 shows an example | ||
#From the Scanner pulldown, select 'Upload Programming' (Figure 2). If you made changes to the various settings for AGC, FTO, custom searches, ect. be sure to check the 'Send Custom Radio Settings' box | #From the Scanner pulldown, select 'Upload Programming' (Figure 2). If you made changes to the various settings for AGC, FTO, custom searches, ect. be sure to check the 'Send Custom Radio Settings' box | ||
| − | #The upload dialog is displayed. Verify that the COM port and speed are correct. If you wish to wipe out the previous contents of the scanner, insure that the Erase All Systems button is checked. When all options are set the way you want them, hit the 'Load Programming' button (Figure | + | #The upload dialog is displayed. Verify that the COM port and speed are correct. If you wish to wipe out the previous contents of the scanner, insure that the Erase All Systems button is checked. |
| + | #Select the system(s) you wish to upload. When all options are set the way you want them, hit the 'Load Programming' button (Figure 4). Note that the number of systems as the upload takes place is nearly always doubled - this is because FreeScan is counting each site and group as seperate objects to be deleted/reloaded. | ||
#It can take up to 20-30 seconds to clear the scanner menu and begin the reload process. You will be notified when the process is complete. | #It can take up to 20-30 seconds to clear the scanner menu and begin the reload process. You will be notified when the process is complete. | ||
| − | #If a COM error is encountered (cannot connect, ect.) click on the 'Freescan' link in the upper left corner. Select 'Setup Com Port' from the pulldown, as shown in Figure | + | #If a COM error is encountered (cannot connect, ect.) click on the 'Freescan' link in the upper left corner. Select 'Setup Com Port' from the pulldown, as shown in Figure 5. See our [[FreeScan - Connecting Scanner to PC|Making the Connection]] article for more information. |
| − | #The Quick Editor (figure | + | #The Quick Editor (figure 6) can be used to quickly delete an entire system from the scanner. To remove a system, first hit 'read scanner', then click on the desired system. Hit 'Nuke Selected Systems'. 'Reset All Memory' will clear the scanner memory so use with '''caution'''. |
Revision as of 13:27, 5 April 2009
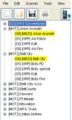
Figure 1
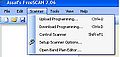
Figure 2
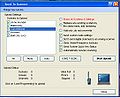
Figure 3
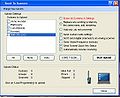
Figure 4
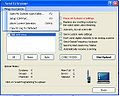
Figure 5
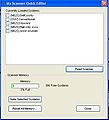
Figure 6


Click on the image to expand
- Load the file you wish to upload. Figure 1 shows an example
- From the Scanner pulldown, select 'Upload Programming' (Figure 2). If you made changes to the various settings for AGC, FTO, custom searches, ect. be sure to check the 'Send Custom Radio Settings' box
- The upload dialog is displayed. Verify that the COM port and speed are correct. If you wish to wipe out the previous contents of the scanner, insure that the Erase All Systems button is checked.
- Select the system(s) you wish to upload. When all options are set the way you want them, hit the 'Load Programming' button (Figure 4). Note that the number of systems as the upload takes place is nearly always doubled - this is because FreeScan is counting each site and group as seperate objects to be deleted/reloaded.
- It can take up to 20-30 seconds to clear the scanner menu and begin the reload process. You will be notified when the process is complete.
- If a COM error is encountered (cannot connect, ect.) click on the 'Freescan' link in the upper left corner. Select 'Setup Com Port' from the pulldown, as shown in Figure 5. See our Making the Connection article for more information.
- The Quick Editor (figure 6) can be used to quickly delete an entire system from the scanner. To remove a system, first hit 'read scanner', then click on the desired system. Hit 'Nuke Selected Systems'. 'Reset All Memory' will clear the scanner memory so use with caution.
Difference in System Types between the BCD396XT and other digital models
With the BCD396T & BCD996T, P25 sites are created as "Motorola Type II / Mot Type II - P25". On the BCD396XT however, this site type is not available (and vice versa), and instead P25 systems/sites are created as "P25 Standard".
By default, FreeSCAN will always creates a P25 system as a Motorola Type II. Prior to uploading this to a BCD396XT, you should change the system type to P25 Standard or the upload will not be successful. A Motorola Type II system will also be created if downloading from another digital scanner such as the BCD996T. It will also have to be changed to P25 Standard prior to upload to a BCD396XT.
If you are downloading from a BCD396XT and plan to upload to a BCD396T or BCD996T, then the opposite is true. You will need to change the system type from P25 Standard to Motorola Type 2, and then change the sites to P25. For any other type of system, you do not need to modify the system type prior to uploading.
Return to the FreeScan User Guide