Ka3jjz
From The RadioReference Wiki
- A PC with some horsepower is needed for using TCP/IP. A PC with at least a 1 Ghz processor is a good starting point
- Questions about this procedure should be directed to the Multipsk reflector at groups.io
Contents
Running the right version of MultiPSK
- When you execute the current live version of MulitPSK (v4.43) the following DLLS and EXE files must be in the MultiPSK directory:
- mir_sdr_api.dll
- msvcr100.dll
- pthreadVCE2.dll
- vcruntime140.dll
- rsp_rcp.exe (thanks to F4FHH Nicolas and SDRplay)
- However if you are executing the version 6 test version (available from here as a zip file), the following are required.
- msvcr110.dll
- libpthread.dll
- sdrplay_api.dll
- rsp_tcp_V_1_1.exe
Using version 4.43 of MultiPSK
Connecting the RSP1 and RSP1A
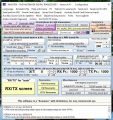
Figure 1 - click to enlarge
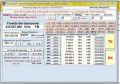
Figure 2 - click to enlarge

When you push the SDRPlay button (figure 1), an I/Q signal will be sent through the TCP/IP server using rsp_tcp.exe. According to tests, it works with Windows 10 and probably earlier versions of Windows. Vista has been tested successfully.
The sampling frequency is 250 Khz but switches to 1 Mhz for all modes except ADS-B, which uses a 2 Mhz sampling frequency.
The default TCP/IP parameters are given below; they can be changed by clicking the Options (port/adress) button, which is found immediately below the SDRPlay button (figure 1).
- The default address is 127.0.0.1. To use another server, paste the server IP address here
- The default port is 1234. but it can be changed with the spin button. Valid values are from 1231 to 1250. This allows the use of several occurrences of Multipsk, each one connected to a different server and receiver.
If you wish to listen to the demodulated sound, click on the +Speaker button
Once you press the RX/TX Screen button, you can use the Transceiver form to control the frequency and gain. Note that the TX button on this form won't function (figure 2). In addition, references to Ham Radio Deluxe and Commander can be safely ignored.
Connecting the RSP2 and RSPduo
Restrictions
- By clicking on the RSP2 bias-tee, the bias-tee (4.7 V / 100 mA max at the ANT-B antenna output) of the SDRplay RSP2 can be set (On) or reset (Off). Note that this option is not saved; it will be necessary to configure this option at each Multipsk start-up..
- The RSPduo will only run in single tuner mode
- Sometimes the above procedure (referred to as the direct method) works, sometimes not. The cause is currently unknown. If it doesn't work, follow the directions below (the indirect method)
Instructions
- Using your favorite text editor create a batch file (with the extension of .txt) with the following command in it. It must reside in the Multipsk folder.
rsp_tcp.exe -E
- The following options may be added
- -P0 for port A (which is the default)
- -P1 for port B
- -P2 for the Hi Z port
- Change the extension using Windows File Explorer from .txt to .bat
- Execute the file
- If you get a good return, start Multipsk
- Press the SDRPlay button. You may press the +Speaker button to hear the demodulated sound
- Press the RX/TX Screen button
Running the test version of MultiPSK
- This procedure applies to all SDRPlay devices. You must install the test version of MultiPSK as noted above
- You must install SDRUno release 1.4 RC2, which can be found here
- If you are using the RSP DX
- Click on the SDRplay options button
- Push the rsp_tcp V.1.1 button
- Press Quit
- This procedure is only needed once. In the future, just press the SDRPlay button to connect to the RSP DX
---
- Return to Copy SW Radiogram using SDRPlay SDRs
- Return to Decoding Software that Interfaces with SDRs
- Return to Connecting Radios to Soundcards
- Return to HF Software Decoders
- Return to SDRs and Digital Decoding
- Return to Shortwave Radiogram Gateway