Broadcastify Raspberry Pi Image
From The RadioReference Wiki
(Redirected from Raspberry Pi Broadcastify Image 2)
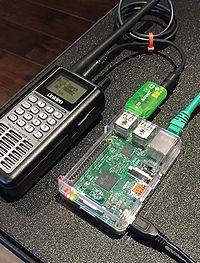
The Broadcastify Raspberry Pi Image comes preinstalled with the following software:
- Darkice - Audio Streamer for Broadcastify Feeds
- Trunk Recorder - SDR Trunked Radio Capture Software for Broadcastify Calls
- RTLSDR-Airband - SDR Capture and Broadcastify Feed Software for AM Aircraft
- VoxCall - Broadcastify Calls Audio Capture Software
- BCFY Shell - Management shell for configuration, management, and update of Broadcastify Feed Services
The appliance also features preinstalled and configured utilities for SDR Software, including RTL-SDR, Airspy, and HackRF utilities.
For downloads and basic installation instructions see:
Contents
Installation and Configuration Videos
- Broadcastify Image Setup - (Step by Step Guide by Joey Absi)
Darkice Feed Configuration
Darkice is easily configured and managed using the BCFY Shell.
Configuring Broadcast Volume
- Plug your scanner's headphone jack into the mic jack on the USB sound card dongle
- Open a shell and start alsamixer
alsamixer
- press F6, choose the "USB Headphone Set" entry
- press your tab key to select the "Capture" device volume control
- use your "up arrow" key to adjust the level to it's lowest level possible (6)
- press escape to exist alsamixer
- run the following command to save the volume settings
sudo alsactl store
Troubleshoot clicking sound in the audio stream
If your stream has a clicking sound when there is no audio, you may be able to eliminate it by turning off Auto Gain Control.
- Open a shell and start alsamixer
alsamixer
- Press F6 and select your audio device
- Press Tab to select "Auto Gain Control"
- Press the "m" key to toggle it off
- Press Escape key to exit alsamixer
- Save your settings with the following command
sudo alsactl store
Trunk Recorder Configuration
Determining RTL-SDR PPM Value
If you are using an RTL-SDR stick with Trunk Recorder, you must determine each individual SDR Stick Gain and PPM error adjustment. Two common methods are:
GQRX Gain and PPM
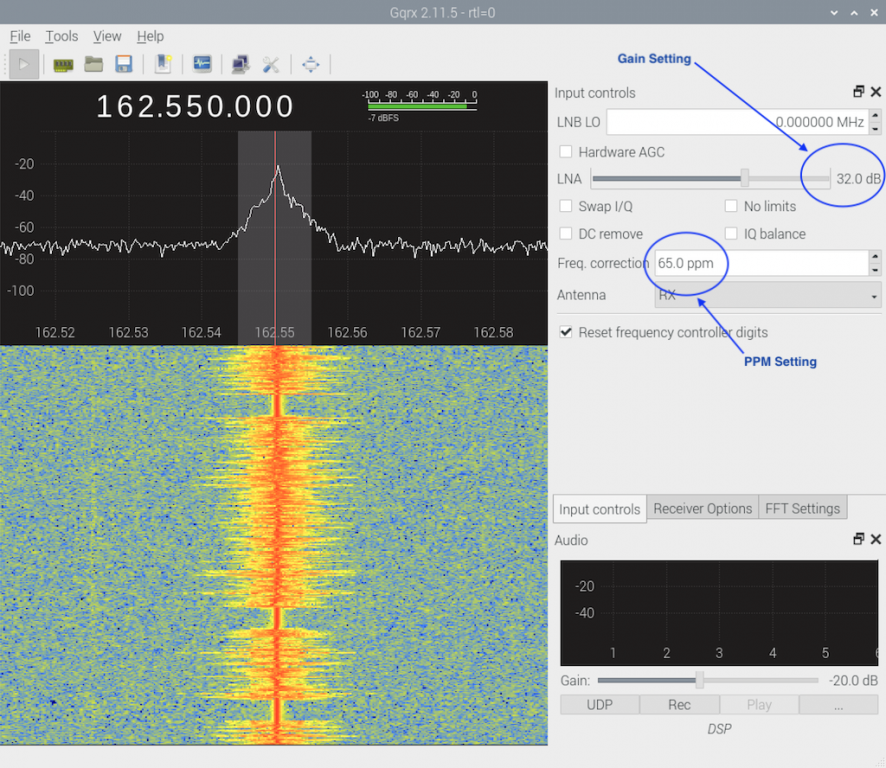
Run GQRX (Icon located on the Raspberry Pi Desktop) and tune to the control channel of the site, or NOAA Weather Radio (162.550 or 162.4000 etc), and adjust the PPM until the signal is centered. Record the PPM value and use in your Trunk Recorder config.
You are looking for a good solid signal with no adjacent overloading of noise or intermod. that could be an LNA gain setting of anywhere from the mid 20’s to the Max of 49.6 based on your antenna setup and RR environment.
rtl_test
Run rtl_test -p for at least 10 minutes and use the average or most reported cumulative PPM setting towards the end of the 10 min period. This will only tell you the PPM adjustment to use, not the gain adjustment.
pi@bcfy-xxxxxx:~ $ rtl_test -p
Found 1 device(s):
  0:  Realtek, RTL2838UHIDIR, SN: 1003

Using device 0: Generic RTL2832U OEM
Detached kernel driver
Found Rafael Micro R820T tuner
Supported gain values (29): 0.0 0.9 1.4 2.7 3.7 7.7 8.7 12.5 14.4 15.7 16.6 19.7 20.7 22.9 25.4 28.0 29.7 32.8 33.8 36.4 37.2 38.6 40.2 42.1 43.4  43.9 44.5 48.0 49.6
[R82XX] PLL not locked!
Sampling at 2048000 S/s.
Reporting PPM error measurement every 10 seconds...
Press ^C after a few minutes.
Reading samples in async mode...
Allocating 15 zero-copy buffers
lost at least 52 bytes
real sample rate: 2047878 current PPM: -59 cumulative PPM: -59
real sample rate: 2047967 current PPM: -16 cumulative PPM: -38
real sample rate: 2048304 current PPM: 149 cumulative PPM: 25
real sample rate: 2048139 current PPM: 68 cumulative PPM: 36
...
10 minutes later
.....
real sample rate: 2048086 current PPM: 42 cumulative PPM: 57
real sample rate: 2048319 current PPM: 156 cumulative PPM: 61
real sample rate: 2048142 current PPM: 69 cumulative PPM: 61
real sample rate: 2048124 current PPM: 61 cumulative PPM: 61
real sample rate: 2048131 current PPM: 64 cumulative PPM: 61
real sample rate: 2047857 current PPM: -69 cumulative PPM: 57
real sample rate: 2048235 current PPM: 115 cumulative PPM: 59
real sample rate: 2048305 current PPM: 149 cumulative PPM: 61
In this example you would want to use 60
Trunk Recorder Config File Entries for Gain and PPM
"sources": [{
       "center": 774581250,
       "rate": 2048000,
       "ppm": 60,
       "gain": 49.6,
       "debugRecorders": 0,
       "digitalRecorders": 4,
       "driver": "osmosdr",
       "device": "RTL2838UHIDIR=00000001"
Multiple Airspy Support
Trunk Recorder is compiled with multiple AirSpy support on the Broadcastify Raspberry Pi image.
When using an AirSpy SDR, you must specify the serial number of your AirSpy device(s) in your trunk recorder config with the following syntax
"device": "airspy=0xABCDEFABCDEF01"
You can determine your AirSpy Serial Number by executing the "airspy_info" command at a shell prompt:
pi@bcfy-xxxxxx:~ $ airspy_info
airspy_lib_version: 1.0.9

Found AirSpy board 1
Board ID Number: 0 (AIRSPY)
Firmware Version: AirSpy MINI v1.0.0-rc10-0-g946184a 2016-09-19
Part ID Number: 0x6906002B 0x00000030
Serial Number: 0xABCDEFABCDEF01989
Supported sample rates:
	6.000000 MSPS
	3.000000 MSPS
Close board 1
Log File
The Trunk Recorder log file is located at
/home/pi/bcfy/logs/trunk-recorder.log
The log file is rotated daily. If you want to watch calls uploaded to Broadcastify Calls in real time, execute the following command at a shell prompt.
tail -f /home/pi/bcfy/logs/trunk-recorder.log
RTLSDR-Airband Configuration
To edit the config file for RTLSDR-Airband enter this command:
sudo nano /usr/local/etc/rtl_airband.conf
and paste the following into the editor
# This is a minimalistic configuration file for RTLSDR-Airband.
# More complex configurations are possible.
# Refer to https://github.com/szpajder/RTLSDR-Airband/wiki
# for description of keywords and config syntax.
# Just a single RTL dongle with one FM channel
# sent to a single Broadcastify stream.
# Note that the center freq is 100 KHz offset from the receive freq
# Also, you must enter your server number, stream name, mountpoint and
# password from your Broadcastify stream "Technicals"
devices:
({
  type = "rtlsdr";
  index = 0;
  gain = 25;  # This may need adjustment depending on your hardware
  centerfreq = 153.87;
  correction = 0;   # this can be determined using "cumulative" output from running 'rtl_test -p' for several minutes
  channels:
  (
    {
      freq = 153.77;
        modulation = "nfm";
        highpass = 320;
     outputs:
        (
       {
          type = "icecast";
          server = "audio#.broadcastify.com";
          port = 80;
          mountpoint = "MOUNTPOINT";  # Note: Do not include a leading slash "/"
          name = "Fire Dispatch";
          genre = "Fire";
          username = "source";
          password = "PASSWORD";
        }
      );
    }
  );
});
Run
It’s time to test. RTLSDR-Airband must run as root in order to have access to the GPU hardware.
sudo /usr/local/bin/rtl_airband -f
You should see a readout of numbers. The numbers should be larger when a signal is detected. Check your Broadcastify stream to see if the feed is streaming live. Once you confirmed everything is working, kill the program with CTRL+C.
Create a service
Now you will want RTLSDR-Airband to run on startup of the Pi as well as restart if there are any errors or crashes over time (bound to happen eventually). Navigate to your systemd startup script folder and create the following serivce file:
cd /etc/systemd/system/rtl_airband.service
sudo nano rtl_airband.service
Paste the following into this file:
[Unit]
Description=SDR AM/NFM demodulator
Documentation=https://github.com/szpajder/RTLSDR-Airband/wiki
Wants=network.target
After=network.target

[Service]
Type=simple
ExecStart=/usr/local/bin/rtl_airband -Fe

# The program may exit only due to startup failure (eg. misconfiguration)
# or due to failure of all SDR devices (eg. disconnection). In either case,
# there is no point to restart it, because it would fail once again.
Restart=Restart=no
RestartSec=5s

[Install]
WantedBy=multi-user.target
Save (ctrl+x and y) and then run these commands to activate the service:
sudo chown root.root /etc/systemd/system/rtl_airband.service
sudo systemctl daemon-reload
sudo systemctl enable rtl_airband
Now to run it, you simply need to type
sudo systemctl start rtl_airband
or just reboot the Pi!
More info, expansion and troubleshooting
Much of this information I gleaned from this very helpful tutorial: https://viatorci.com/posts/rtlsdr-police-scanner/#install-rtlsdr-airband There are so many more possibilities with this setup and you can scan, receive multiple channels within the rtl-sdr's bandpass and a multitude of other things. This page is intended to get you streaming quickly and is not intended to address all of those scenarios.

