Adding Misc Data and News to the Wiki
From The RadioReference Wiki
This article will assume that you already have established your RR User ID and password on the wiki; if you haven’t, please use the LOG IN / CREATE ACCOUNT link found about 1/3 the way down on the left of the page and fill in the required information
Preparation
Click on the image to expand it
- Once you have identified data in either the Miscellaneous System Information or News areas you wish to migrate, copy it into a Notepad file or similar. Be sure to store it as a text, and never as a Word .doc file, as sometimes Word formatting causes strange characters and other issues to pop up when the article is stored.
- Surround the data with the <pre> command as shown in figure 1. Also note the Category statement at the end of the figure. This statement is surrounded by double square brackets (found to the right of ‘P’ on the keyboard).
- Record in which state and county (or counties) to which this data belongs. If the county name shows more than one county (see figure 2), then click on it; note the names of these counties (figure 3). The state and county (or counties) will become important later.
- Save this data away.
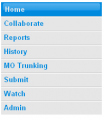
- Click on the Collaborate tab found on the left side of the page (figure 4)
- Go to the bottom of the page, and click on the Wiki link found there (figure 5)
Store Your Data
Click on the image to expand
- If the article for this entity in the database does not exist in the wiki, follow the prompts in the page and click on the ‘Edit’ link (figure 6). The screen will blank out.
- If it does exist, you should be taken directly to the wiki article. Click on the ‘Edit’ link on the left of the screen (figure 7)
- It’s a good idea to give the new data a header to keep the flow of data in the article clear. Headers in the wiki are very similar to those in Word, which uses h1-h5 level headings in the document. The level of the header is indicated by the number of equal signs surrounding the text; you can edit this section to see an example.
- Put in a couple of lines of explanatory text. Explain why the data is here, and for what system. Just a couple of sentences will do to give some context to the data.
- Copy/Paste the data you stored previously. If the article is new, make sure the Category statement is included at the end of the article when the paste is completed; if the article is not new, copy the statement on a new line. The order in which the various categories appear is not significant.
- Preview your article by hitting Show Preview found at the bottom of the page (figure 8). Make any editing changes necessary to insure the data stays within the dotted line box, or else it can become difficult to read.
- If it all looks OK then hit Save Page. If the article is a new one, copy the new name, and place it along with the state and county information saved earlier.
Attaching the Data
- If the data you copied was placed in a pre-existing article, you only need to do the last step, and you're done – if not, there are a few more steps that need to be taken. When a new article is created, it doesn’t link to or is a part of anything. Consequently it’s called an orphan, and this is a problem – to read it, someone will have to search to find it.
- We need to link (or attach) the new article to one (or sometimes more) existing articles. The more articles the new article is linked to, the easier it is to be found, and more likely to be read.
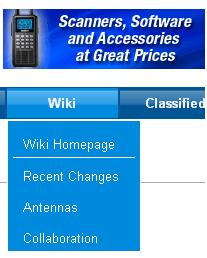
- Float your mouse over the Wiki pulldown in the blue toolbar underneath the Scanner Master logo. Select Collaboration (see the image at right)
- You are now in the Collaboration Gateway. This is the front page for the Collaboration project, and contains links to each of the states, several Canadian provinces as well as some Australian states. Click on the state from the list where this data belongs (this is one of the items you saved away earlier).
- Most all of the state articles have a list of counties; click on the link for it, and select the county from the one you stored earlier
- On a new line, place an asterisk (shift of 8) in the leftmost column, and surround the title of the article (which you also recorded earlier) in double square brackets (yes, it’s the same method you saw when creating a Category link).
- Click on the Save Page button (figure 8 in the previous section)
- If the system belongs to more than one county, then repeat this process until all counties have the link to the new data.
- If you are admin be sure to delete the data from the database once the copy is complete. If not, be sure to use the submit info link to create a ticket to get it removed.
- That’s it. The admins will review the new data, attach new categories to it and do whatever remaining cleanup is required.
Return to: RR Wiki User's Guide


