Installing a Discriminator Tap on a BC350C
From The RadioReference Wiki
Materials Required
- Soldering iron
- Solder - Lead Free Electrical Rosin Core Solder (Benzomatic Silver Bearing 1.6mm)
- Desoldering braid/Solder sucker -- just in case something messes up
- Wire - Automotive electrical wiring, 16/18 gauge should be fine
- 3.5mm panel jack
- Tweezers + tiny flat head screw driver + Philips screw driver
- Hot Glue Gun
- Drill + proper sized drill bit
- Uniden BC350C Radio Scanner
Pictures
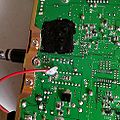
Pin 1 on the chip to centre pin of discriminator jack
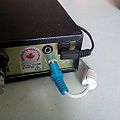
Rear of BC350C with disc jack


Instructions
- Take the side screws off the scanner to remove the top and bottom.
- Remove the attached speaker
- Feed an insulated wire to the bottom of the chip.
- Locate Pin 1 of the chip (this is not the same chip as the 350A). Pin 1 is the bottom left pin if you're looking at the notch being on the left with the chip on top. Flipping it over you will find it on the top right instead of bottom left.
- Attach the wire with solder to Pin 1 and feed to the top of the circuit board through a gap in the case.
- Hot glue the solder point so the cable doesn't move then hot glue the cable when it's tucked underneath the case so it doesn't move.
- Solder the other end of the wire to the centre pin of your 3.5 mm headphone jack .
- Solder a ground wire to the ground pin of your headphone jack and then attach it to a ground screw on the scanner/case.
- Hot glue the headphone jack to prevent movement.
- Make sure the built-in speaker is still disconnected (I could not get the discriminator tap to work with the speaker plugged in I think) and tuck the cable in neatly underneath.
- Reattach the case and hook up the power, antenna and hook up a headphone jack cable to a line-in on a computer
- Turn the volume to almost max and then adjust Line-In gain to boost signal in trunking software/decoding software. In UniTrunker I needed to boost the audio all the way to get roughly 95% decode.