Difference between revisions of "Freescan RR Trunk Import"
From The RadioReference Wiki
| Line 2: | Line 2: | ||
Image:FS RR Import conv pulldown.JPG|Figure 1 | Image:FS RR Import conv pulldown.JPG|Figure 1 | ||
Image:FS RR trunk import1 v8.JPG|Figure 2 | Image:FS RR trunk import1 v8.JPG|Figure 2 | ||
| − | Image:FS RR trunk | + | Image:FS RR trunk import3 v8.JPG|Figure 3 |
| − | Image:FS RR trunk | + | Image:FS RR trunk import2 v8.JPG|Figure 4 |
Image:Trunk skip tags.JPG|Figure 5 | Image:Trunk skip tags.JPG|Figure 5 | ||
Image:FS RR trunk dbview.JPG|Figure 6 | Image:FS RR trunk dbview.JPG|Figure 6 | ||
| Line 13: | Line 13: | ||
#From the file pulldown select Import then RadioReference Trunked (figure 1). For a moment, your subscription expiration date will flash on the left lower corner of the form | #From the file pulldown select Import then RadioReference Trunked (figure 1). For a moment, your subscription expiration date will flash on the left lower corner of the form | ||
| − | #To begin the process, choose whether you are using the RR Web service online or via the CD ROM; | + | # To begin the process, choose whether you are using the RR Web service online or via the CD ROM; |
| − | ## If you are online and wish to use the RR web service, enter your RadioReference Userid and Password | + | ##If you are online and wish to use the RR web service, enter your RadioReference Userid and Password and hit 'Connect'. Note that once you are signed on, you can use the History pulldown to return to a previously-utilized RR site. Note the hotkeys are accessed with ALT and a number (figure 2). |
| − | ## If you are using the RR CD ROM, insert it into your CD drive, then hit the RR CD button. | + | ##If you are using the RR CD ROM, insert it into your CD drive, then hit the RR CD button. {{color|red|NEW 2.02}} |
| − | #There are no scanners currently available that can handle encrypted systems; so it's advisable to turn that option on | + | # Once you have hit 'Connect' or the CD has loaded, select your home country from the pulldown. Under the country name there are flags for the US or Canada; if you are importing from either of these countries, click on the appropriate flag, then hit the 'Save Present Location' button to the left of 'Available Systems'. If you need to recall the location again, use the 'Recall my Home Location' button immediately to the right of the Canadian flag. |
| − | #You can | + | #Select the state or province from the 'Province/State' pulldown. Wait for the counties are populated - a number will show up on the right top side of the 'county' pulldown |
| − | + | #Select the desired county from the 'county' pulldown. A number next to the 'Available System' title to the right will show the number of systems available. | |
| − | #You can cause the import to ignore talkgroups with specific tags. | + | #Select the desired system from the 'Available System' pulldown. |
| + | #Figure 3 shows a populated screen with sites and groups. To select only some sites, hit the 'None' button, then '''double click''' the site you wish to import. The same logic works on the group screen on the right. | ||
| + | #Figure 4 shows the available options. | ||
| + | ##There are no scanners currently available that can handle encrypted systems; so it's advisable to turn that option on. | ||
| + | ##You may also choose to pre allocate a quick key for your site - if you forget, it's still available if you edit the site afterward. | ||
| + | ##You can select "Only Download control channels" to download only primary and alternate control channels (marked in {{color|blue|blue}} and {{color|red|red}} respectively). This function - [[Control Channel Only]] - is only available on Motorola type systems. | ||
| + | #You can cause the import to ignore talkgroups with specific tags. '''Double Click''' the name you wish to ignore and talkgroups with these tags will be suppressed (figure 5). Single clicking the name resets the selection. Note that if you are using the RR CD Import, this function is not available {{color|red| NEW 2.02}} | ||
#If you wish to view the entry on the RadioReference database, click the 'View in Browser' button. An example of the result is shown in figure 6 | #If you wish to view the entry on the RadioReference database, click the 'View in Browser' button. An example of the result is shown in figure 6 | ||
| − | #When you are satisfied, click on 'Import'. The system, along with all available frequencies and talkgroups will be imported | + | #When you are satisfied, click on 'Import'. The system, along with all available frequencies and talkgroups will be imported. Be sure to edit the entries for options, quick keys, ect. (figure 7). In particular, be sure to check - and change - the '''site type''' as it does not necessarily import correctly. Use the pulldown to change it if needed. |
#When available, coordinates from RR Web service are imported as well. Be sure to enable the use of this function on the system screen | #When available, coordinates from RR Web service are imported as well. Be sure to enable the use of this function on the system screen | ||
## Site notes from the RR Web service are now imported along with the system. When you click on a site, the associated note will appear under the site settings. | ## Site notes from the RR Web service are now imported along with the system. When you click on a site, the associated note will appear under the site settings. | ||
Revision as of 19:20, 19 October 2010
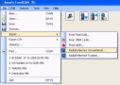
Figure 1
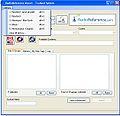
Figure 2
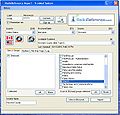
Figure 3
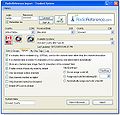
Figure 4
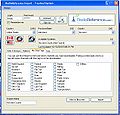
Figure 5
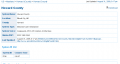
Figure 6
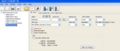
Figure 7
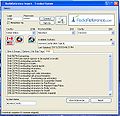
Figure 8


Click on the image to expand
- From the file pulldown select Import then RadioReference Trunked (figure 1). For a moment, your subscription expiration date will flash on the left lower corner of the form
- To begin the process, choose whether you are using the RR Web service online or via the CD ROM;
- If you are online and wish to use the RR web service, enter your RadioReference Userid and Password and hit 'Connect'. Note that once you are signed on, you can use the History pulldown to return to a previously-utilized RR site. Note the hotkeys are accessed with ALT and a number (figure 2).
- If you are using the RR CD ROM, insert it into your CD drive, then hit the RR CD button. NEW 2.02
- Once you have hit 'Connect' or the CD has loaded, select your home country from the pulldown. Under the country name there are flags for the US or Canada; if you are importing from either of these countries, click on the appropriate flag, then hit the 'Save Present Location' button to the left of 'Available Systems'. If you need to recall the location again, use the 'Recall my Home Location' button immediately to the right of the Canadian flag.
- Select the state or province from the 'Province/State' pulldown. Wait for the counties are populated - a number will show up on the right top side of the 'county' pulldown
- Select the desired county from the 'county' pulldown. A number next to the 'Available System' title to the right will show the number of systems available.
- Select the desired system from the 'Available System' pulldown.
- Figure 3 shows a populated screen with sites and groups. To select only some sites, hit the 'None' button, then double click the site you wish to import. The same logic works on the group screen on the right.
- Figure 4 shows the available options.
- There are no scanners currently available that can handle encrypted systems; so it's advisable to turn that option on.
- You may also choose to pre allocate a quick key for your site - if you forget, it's still available if you edit the site afterward.
- You can select "Only Download control channels" to download only primary and alternate control channels (marked in blue and red respectively). This function - Control Channel Only - is only available on Motorola type systems.
- You can cause the import to ignore talkgroups with specific tags. Double Click the name you wish to ignore and talkgroups with these tags will be suppressed (figure 5). Single clicking the name resets the selection. Note that if you are using the RR CD Import, this function is not available NEW 2.02
- If you wish to view the entry on the RadioReference database, click the 'View in Browser' button. An example of the result is shown in figure 6
- When you are satisfied, click on 'Import'. The system, along with all available frequencies and talkgroups will be imported. Be sure to edit the entries for options, quick keys, ect. (figure 7). In particular, be sure to check - and change - the site type as it does not necessarily import correctly. Use the pulldown to change it if needed.
- When available, coordinates from RR Web service are imported as well. Be sure to enable the use of this function on the system screen
- Site notes from the RR Web service are now imported along with the system. When you click on a site, the associated note will appear under the site settings.
- Bandplans for trunk sites importing from RR are now handled on a per-site basis versus a per system basis. This is to accommodate the new systems that have different bandplans for different towers.
- All RR Web service messages are now logged. See Figure 8
- See the Tips article for important information on limits and known issues
TGID Expander
FreeScan also has a function called TG Expander. This works in the following manner; FreeScan stores all the talkgroup information in memory, even if there are more talkgroups than the scanner can actually store. Even if you run the scanner in ID SEARCH mode, FreeScan will examine memory to find the alpha tag for the appropriate talkgroup.
Return to the FreeScan User Guide