Difference between revisions of "Connecting scanners via USB"
From The RadioReference Wiki
| Line 45: | Line 45: | ||
|- | |- | ||
|[[Pro-94]] | |[[Pro-94]] | ||
| − | | | + | |{{color|green|YES}} |
| | | | ||
| | | | ||
| Line 62: | Line 62: | ||
| | | | ||
|[[Pro-2051]] | |[[Pro-2051]] | ||
| − | | | + | |{{color|green|YES}} |
|- | |- | ||
|[[Pro-97]] | |[[Pro-97]] | ||
Revision as of 13:27, 13 January 2010
With the lack of serial ports on newer PCs these days, having to connect to a USB port is a necessary, but sometimes frustrating, evil. The listings below detail which USB cable to buy, and other important conditions.
Contents
GRE Scanners
- GRE 30-3290 USB Cable
- RS 20-047 USB Cable
- Do NOT use the mono-stereo pigtail with these radios
Radio Shack Scanners
- Uses the same 2 USB cables as the GRE listing.
- NOTE: The PRO-94 came out with a B version years ago which is the only one that is PC addressible (up/download data only)
- NOTE: The PRO-2052 is a Uniden product with a DB9 connector in the back.
| Model | Use RS Pigtail? | Model | Use RS Pigtail? |
|---|---|---|---|
| Pro-82 | |||
| Pro-83 | YES | ||
| Pro-84 | |||
| Pro-92 | NO | Pro-2067 | NO |
| Pro-93 | Pro-2053 | ||
| Pro-94 | YES | ||
| Pro-95 | Pro-2053 | ||
| Pro-96 | NO | Pro-2096 | NO |
| Pro-2051 | YES | ||
| Pro-97 | NO | Pro-2055 | NO |
| Pro-99 | |||
| Pro-106 | NO | Pro-197 | NO |
| Pro-107 | |||
| Pro-135 | |||
| Pro-137 | NO | ||
| Pro-162 | Pro-160 | ||
| Pro-164 | NO | Pro-163 | NO |
| Pro-404 | NO | ||
| Pro-528 | Pro-433 | ||
| Pro-405 |
Uniden Scanners
- Uniden USB-1 cable (Scanner Master)
- NOTE: Uniden handhelds often come with their own serial programming cable. A USB cable is still required to interface with PCs that don't have serial ports.
- Scannersoft Accessories page Note: markets Scan Control software
Installation Notes
Checklist and Procedures
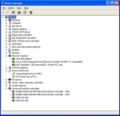
Figure 1
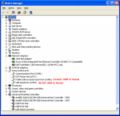
Figure 2


- Use Device Manager (see the section below) to determine if other COM ports are available, and not held by Bluetooth or other devices. Sometimes such devices will hold an address even if it's not actually in use (Figure 1).
- Download the most up to date drivers from the manufacturer or distributor and install. Figure 2 shows one possible result. At this point you need to validate if your application can actually address the COM port that has been assigned. If it can't...
- In the 'Ports (COM & LPT)' section of Device Manager you should see an entry that reads something like 'Serial on USB Port (COM 15)'. The actual text will vary with the driver's documentation
- Select the Serial Device Entry in the list
- Right click on it and select Properties
- Select the Port Settings tab and click on the Advanced button. Change the COM port address.
- Connect the adapter
- Connect the cable from the scanner.
All of this assumes that you have first set the COM port of your scanner up to the transfer speed you desire. Sometimes a scanner will register as 'not available' until this procedure is completed. It's beyond the scope of this article to detail this, as it tends to vary. Often this is detailed in the back of the owner's manual. If you don't have one, it's very likely a PDF version of the manual is available from the distributor or manufacturer's website, or sometimes on the Yahoo group that covers your scanner.
Accessing Device Manager
Unfortunately sometimes ports aren't available when you think they are, or everything appears to have installed correctly, but still doesn't seem to work. The tool that will allow you to check this is Device Manager. You can access this tool in several ways, depending on the OS;
- XP: Start>Control Panel>System>Hardware>Click on the Device Manager button.
- Vista: Control Panel>System and Maintenance>Device Manager
- Win7: Control Panel>System and Security>System>Device Manager
- Click on Start in the Taskbar then Run and enter devmgmt.msc in the resulting box
- Press the Windows key+R, in the resulting menu type 'devmgmt.msc'
- Click Start --> Right click on My Computer and select Properties, click the Device Manager link on the left.
- Press the Windows key + pause/break key
- Set up a .bat file with the following using Notepad or Wordpad. When you want to run this, right click on it, select Run as Administrator (Vista, Win7)
set devmgr_show_nonpresent_devices=1
cd %SystemRoot%\System32
start devmgmt.msc
Return to the Uniden DMA FAQ